Pineapple bag
(767760 views)
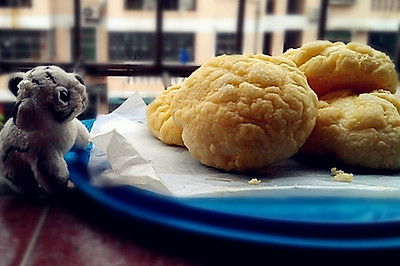
This pineapple bag is made according to Jun's prescription. I want to make it some time ago. But I haven't made bread. I'm afraid of failure. I've learned to make some bread these days. It's not bad. So I made this pineapple bag specially today. If you haven't made this bread, I strongly recommend you try it. This pineapple bag is very delicious, especially when it's hot.
Cooking ingredients
Cooking Steps

Step1:Prepare the material for the brea
Step2:Yeast dissolved in warm wate
Step3:Mix all materials except butte
Step4:Knead into doug
Step5:Add butte
Step6:Knead to the expansion stage. It can pull out the fasci
Step7:Cover with plastic wrap and put in oven for one hou
Step8:Prepare all the pineapple peel material
Step9:Beat the softened butter with an eggbeater until it turns whit
Step10:Add sugar powder, salt, milk powder and mix wel
Step11:Add the egg mixture three times. Mix the egg liquid and butter thoroughly every time, and then add the next step to avoid the separation of oil and water, which will affect the crispness of pineapple pee
Step12:Stir until the butter and egg mixture are completely combine
Step13:Sift in low gluten flour and mix gently. Don't use an egg beater. Use a spoon to gently cut and mix. Do not use the method of kneading to stir, so as not to affect the crispness of flou
Step14:Mix until smooth and not stick
Step15:The dough is fermented to 2.5 times the size. Dip your fingers in flour and poke a hole. The hole will not shrink
Step16:Exhaust the dough. Divide into 4 parts. Roll. Ferment for 15 minutes
Step17:Thin powder is applied to the case. The pineapple skin is rubbed into strips and cut into 4 pieces to be round
Step18:Take a pineapple peel with your left hand. Take a dough with your right hand and press the dough on the pineapple peel with a little force. Flatten the pineapple peel with your right hand and knead the dough from the outside to the inside. Let the pineapple peel slowly climb onto the dough
Step19:Continue to knead the dough from the outside to the inside. Look. The pineapple skin has been slowly wrapped on the dough. Continue. Don't stop. Until pineapple skin covers more than 3 / 4 of the doug
Step20:Close down. Pineapple skin is ready
Step21:Brush the surface of pineapple skin lightly with egg liqui
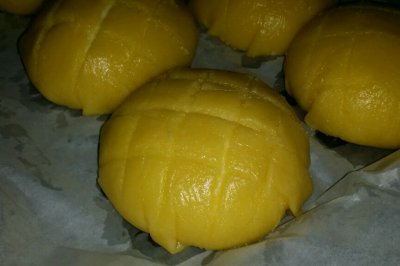
Step22:Use a knife to draw a check on the pineapple ski
Step23:After the pattern is finished, the final fermentation can be carried out. Ferment to about 2.5 time
Step24:Preheat the oven to 180 ℃ and bake for about 15 minute
Cooking tips:1. When baking, if the color of pineapple skin surface has been baked in place, you can turn off the fire. By the end of the time. 2. When making pineapple skin, if the pineapple skin is still sticky after mixing, you can make up some flour with low gluten. The pineapple skin is not sticky. 3. When wrapping the pineapple peel, you can roll the pineapple peel into pieces and cover the dough on the chopping board in addition to the above technique. But the pineapple peel is easy to stick on the chopping board and easy to break. Unless you sprinkle a lot of dry powder on the chopping board, it will affect the crispness and taste of pineapple peel.